Building and Using A Two Box Solar Oven
by Kathy and Bruce Jacobs
Build a simple solar oven using two cardboard boxes, some foil, some duct tape, and a piece of plexiglass. (Total cost to build: Less than $5US!)
Preparation
Find two boxes just a bit smaller than the other. The long sides of the box should be less than twice as long as the short side of the boxes. The smaller box should fit inside the larger box with about 1 inch in each direction to spare. The boxes can be cut down so that they fit together properly. Leave the flaps on the boxes. Buy a small sheet of Plexiglas (tm) a little bit smaller than the width and length of the top of the box. You will also need four pieces of cardboard to use for reflectors.
Build the Oven
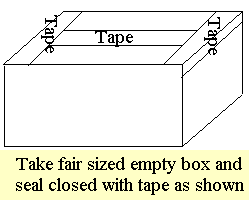
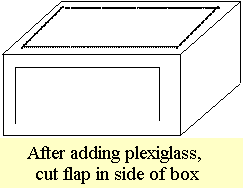
First, prepare the inner box by taping it shut and taping the seams so the box is air tight. Box should look like the diagram below:
Next, mark the top of the box to make the hole for the plexiglass sheet. An easy way to do this is:
Slide the plastic sheet to one side about Πinch. Draw a line on the top of the box along the edge you just moved closer to the center of the box. Center the sheet on the top of the box again and slide Πthe opsite direction. Draw the lines again.
- Slide the plastic sheet to one side about Πinch.
- Draw a line on the top of the box along the edge you just moved closer to the center of the box.
- Center the sheet on the top of the box again and slide Πthe opposite direction.
- Draw the lines again.
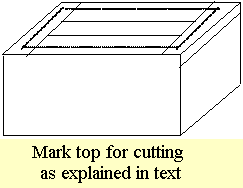
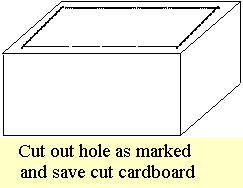
Cut out the top of the box along the lines you just drew on the top. Save the cardbord you removed.
Center plastic sheet over the top of the box. Tape down the edges of the plastic sheet to the box so that the box is airtight again while avoiding covering the plastic. The sunlight will now go though the plastic lid into the box to heat the food. but the heat generated will not be able to escape.
Cut three slots in the long side of the box. This will be your door for inserting the food to be cooked. Place the scraps of cardboard from the top of the box into the oven for future use.
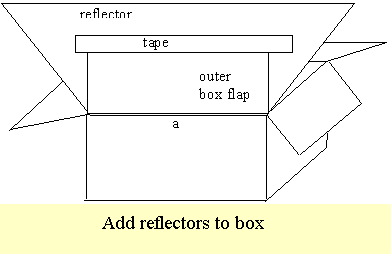
Next, build the outer box. This box serves two purposes. It insolates the inner box to slow down heat loss from the bottom and sides. It also holds up the concentaing flaps which reflect extra sunlight into the cooking box.
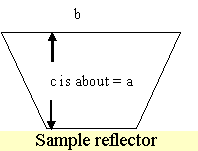
The first step in building the outer box is to make the reflectors. Measure the long side of your box. (a)
Note: The only dimention in the whole project that is critial is the length of side a for each piece. This side will eventually be taped to the flaps on the outer box.
You will need 4 rectangles of cardboard. The short sides sides of the rectangles should be close to the same as the length of the long side of the box (or longer) the long sides should be at least half again as long as long side of your outer box. Cut the cardboard so that it looks like sample diagram.
Glue (or tape with strong clear tape) alumimun foil to one side of this flap. If you plan on moving your oven before you use it, you may wish to do the rest of the tape joints loosely to allow them to be removed when transporting the oven.
Tape the back (non shiny) side of the flap to the inside of one of the long flaps on the outer box.
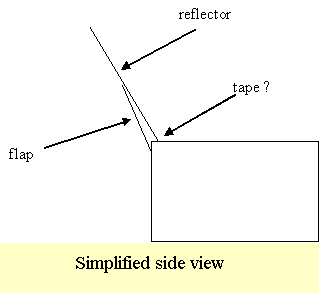
As each reflector is added, it should look like the side view diagram. A small piece of tape where indicated can help with the stability of the reflectors.
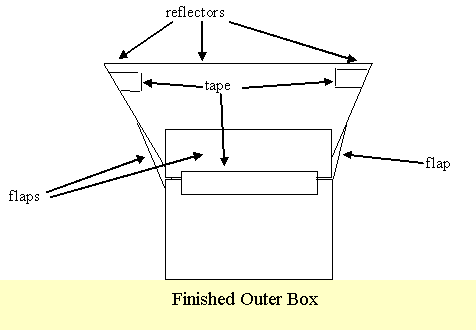
The outer box is now completed and should look like the finished outer box diagram from all four sides. Be sure to tape the corners for stability.
Cook with the Oven
Parts needed:
- Boxes built above
- Two props (usually one is cardboard, one may be a rock...)
- Food to cook (cookies or bread sticks work well)
- Container for food. Teflon skillet with handle removed works well
- Optional: Thermometer
Oven usage:
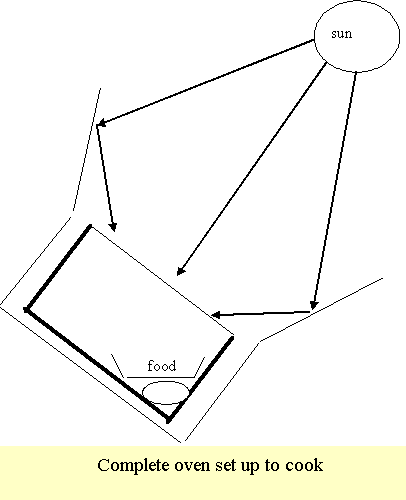
- Place food in shallow light weight pan or pot (a dark color is best). Place reserved piece of cardboard in bottom corner of the oven away from the door. Prop outer box so that the opening in the box is facing the sun. The box will now be tilted. Your oven should face the sun as shown in the diagram.
- If you wish to see the inside temperature of the oven, place the thermometer in the oven near the food.
- Food takes about twice as long as in normal oven not counting preheat time. Do not try anything where timing was critical. Also note that the oven does not seem to brown or burn the food as it only gets up to about 275 degrees inside.