Controlling the Heat
by Kathy and Bruce Jacobs
Controlling the Heat
One of the advantages of Dutch oven cooking is that the oven can be set up so that the baker has complete control of the temperature of the oven. This is true even in windy or rainy conditions.
We were helping at a Cub Scout family outing once and had the boys mix up two cake mixes and put them in Dutch ovens. Just as we were finishing the mixing, it started to rain very hard. Eventually, we even had some hail. Everyone went into the tents and cars to wait for a break in the weather to pack and go home.
After ensuring that the Dutch ovens were set up correctly, Bruce stood in some shelter near the fire, to keep an eye on the fire, which looked like it had gone out. 45 minutes later when it cleared up we took the hot food around to the other members of the group. They were quite pleased and surprised that the food was hot and tasted good.
You too can get these kinds of results by following the tips in this article.
The Basics
We are using the Dutch oven to bake the food. We want the heat to be evenly applied to the entire surface of the food. If I mix up a cake mix and place it on a stove in a frying pan, I do not expect the cake to turn out nice. The bottom would get burned long before the top would get warm and I would need to stir it constantly. We do not want to boil our cake. So, we need to find a way to bake the food instead of boiling it.
Before we try this with a Dutch oven, let's start out with a frying pan with three legs and heat it with charcoal. (If you don't have a fry pan with legs, use a three legged trivet.
Make sure the bottom of the pan is thick. This will help distribute the heat to the sides and prevent hot spots. Next, make sure the fry pan has a lid. This will keep some of the heat from escaping out of the top. The problem here is the only heat that gets to the top of our cake is heat escaping from other parts of the pan.
To send heat down from the top, we put burning charcoal briquettes on the top of the lid. Still, the heat from the charcoal on the lid mostly goes straight up into the air because hot air rises. The charcoal on the bottom sends heat directly into the bottom of the fry pan. Experimenting a bit, we find that the it works best if we put about twice as much charcoal on the lid as underneath the pan. This set up works so well that we have baked pies and such in heavy frying pans with lids.
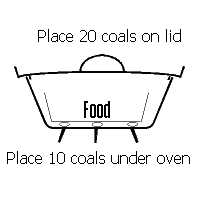
You can bake outside in a frying pan with a lid. However, it is much easier if you use an outdoor Dutch oven. The Dutch oven is designed for this application. (See the article on selecting a Dutch oven) We want to place 8 to 10 gray charcoal briquettes on the ground, put the Dutch oven with the food inside on top of these coals. Now put the lid on the oven and 15 to 20 briquettes on top of the lid. This is roughly equivalent to a 350 degree oven. (Note: This assumes your Dutch oven is a 10 to 12 inch oven. For odd sized ovens look at the information that came with the oven.) Go away for the length of time on the recipe plus 5 minutes for the oven to warm up. Check the food and eat it if it is done.
You can put more coals on the top and possibly on the bottom to create a higher temperature. The strict control of temperature is not as important for a Dutch oven as it is with a regular oven because the lid traps the moisture in. Your home oven probably has a vent below the back right hand burner which lets some of the good stuff out when you use it!
This system works even better if you set up your Dutch oven with a liner pan and spacer beads as shown below.
Advanced Temperature Control
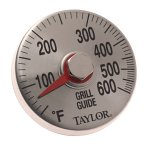
The above rules work very well under normal circumstances. However, they probably will not work if it is windy or raining. What we always do when working with Dutch ovens is to use an oven thermometer. Find a small metal oven thermometer (if it has glass covering over the dial that is not a problem, but no plastic). Usually they have a flap of metal on the bottom that is bent 90 degrees to act as a stand. Bend this metal flap back. What we want to have after this modification is a thermometer that can lay flat on top of the lid with the dial facing up and the back of the dial down and in contact with the top of the lid. If placed on its back and surrounded with coals the temperature reading should be about the same as the inside temperature of the oven! Allow some time for the temperature to stabilize. Because the thermometer is next to the coals the extra heat compensates for the heat which escapes into the air. Do not cover the thermometer with coals however or it will be worthless. Note: It is a good idea to test the thermometers in your home oven first as about one in ten of cheapest kinds don't work.
If you want to take this one step further, Taylor Thermometers makes a Magnetic Grill Thermometer which will sit on the top of your Dutch oven and stay there. It looks like this:
Control the heat, keep the fire dry: Use a foil rim
If you need more coals you can add some to the top. Don't worry too much about the coals on the bottom. and don't go much oven ten coals on the bottom with a standard oven or you will burn the bottom. Wind and especially rain are better handled by proper use of foil instead of just adding more coals.
Placing a sheet of foil over the lid to cover most of the coals while still allowing air in will drive the temperature up quickly.
Under the correct conditions the temperature of the lid can go from 310 degrees to over 550 in less than 5 minutes. When working with foil be careful to keep close eye of the thermometer. The oven can quickly get too hot even when there is a hard rain. If it gets too hot, open the foil a little way to allow some of the heat to escape.
Using these techniques you will amaze all around you as much as we amazed those Cub Scouts!